14.4 Geometry Management
You've already seen the purpose of the pack method. The name of the game is "geometry management," the art of arranging widgets on the screen and specifying a policy for rearranging themselves when the screen is resized. Tk supports three types of geometry managers: placer, packer, and grid. The placer is the simplest of the lot. Like Motif's Bulletin Board widget or Visual Basic's geometry management policy, you have to specify the x and y coordinates of each widget. I'll just refer you to the Tk documentation for more details on the placer.
14.4.1 Packer
The packer, like Motif's Form widget, is a powerful constraint-based geometry manager. The packer is not an object; it is simply the algorithm implemented by the pack() method. In other words, the call $widget->pack() is a request to the widget to pack itself in the next available space inside its containing widget.
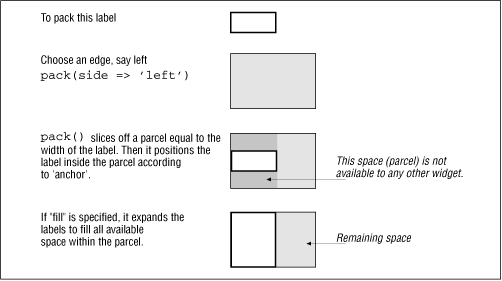
When you pack a suitcase, you typically start at one end and, for every item, proceed to fill in the remaining space. The packer works exactly like this, but there's one crucial difference. Once it sticks a widget onto an edge of a container widget, it slices off that entire edge and takes it off the remaining available space. Figure 14.10 illustrates the packing algorithm.
Figure 14.10: Packing algorithm

In this figure, if the side were specified as top or bottom, the height of the label would dictate the height of the sliced parcel.
You can use pack to accomplish three things:
Specify the order in which a widget is considered for packing.
The order in which you invoke pack determines the packing order, which in turn determines the amount of available space that a widget has access to. When the container is resized, the packing algorithm is run again in the same order.
Specify how it fills up its parcel.
This option is dictated by the fill value: x (expand the widget in the x direction to fill up the width of the parcel), y (expand to fill up the height), both, or none. The ipadx and ipady options reserve some internal padding space around the widget, so the allocated parcel can be made that much bigger than the dimensions required by the widget. The anchor option specifies the edge or corner of the parcel to which the widget sticks. It defaults to "center".
Specify what should be done with the remaining space left over in the parent after all widgets have been inserted.
This is provided by the expand parameter. Normally, the last widget to be inserted gets the rest of the available space, and it can "fill" up that space. But if other widgets have been packed with an expand value of "y" (yes), then any extra horizontal space is equally divided up among all widgets that have specified this option and whose side is left or right. Similarly, extra vertical space is divided between all widgets that have the values "top" or "bottom." Note that the packing algorithm can never overlap widgets.
You might be wondering how to insert three widgets on the left side (as shown in Figure 14.11) if the first widget to be inserted takes over the entire side.
Figure 14.11: Packing three widgets to the left

The only way to solve this problem is to create a frame widget and stick it in the left side of the top window. Since a frame is a container for other widgets, these three widgets can be packed inside this frame, as shown in the following code:
$frame->pack(-side => 'left', -fill => 'y', -expand => 'y');
# Now create buttons b1, b2 and b3 as children of frame, and
# pack top to bottom
$b1 = $frame->Button (-text => 'Oh   ')->pack();
$b2 = $frame->Button (-text => 'Hello')->pack();
$b3 = $frame->Button (-text => 'There')->pack();
pack inserts the widgets from top to bottom, by default.
Alternatively, you might just find it easier to work with the grid geometry manager.
14.4.2 Grid
The grid method tells the widget to use the grid geometry manager. All child widgets within one parent must use the same geometry manager, but you are free to use any geometry manager of your choice for a given combination of a parent and its contained widgets or for widgets nested within each child.
The grid geometry manager allows you to slot widgets in rows and columns, much like HTML's table tag. The maximum width of any widget in a column determines the width of that column, and the height of a row is determined by the maximum height of any widget. This is how you use gridded geometry management:
$button->grid (row => 0, column => 0);
This command puts the button on the top-left corner.
Like HTML's tables, a widget can be made to span any number of rows and columns, using the rowspan and columnspan options. The widget still belongs to the row and column specified by "row" and "column" but straddles the required span of columns and/or rows, as shown in the following example:
$button->grid(row => 1, col => 2,
              columnspan => 2, sticky => 'ns');
The button in this example straddles two columns but doesn't use up all the space. The sticky option instructs the grid to make the widget stick to the north and south walls of the cell in this case. If you configure it as "nsew," the widget is stretched to fill the entire cell. By default, the widget is centered inside the parcel and occupies only as much space as it requires. Like the packer, the grid also understands the ipadx and ipady options.


